


(English follows.)
DIY好き、そしてキャンプ好きの皆さん、こんにちは。
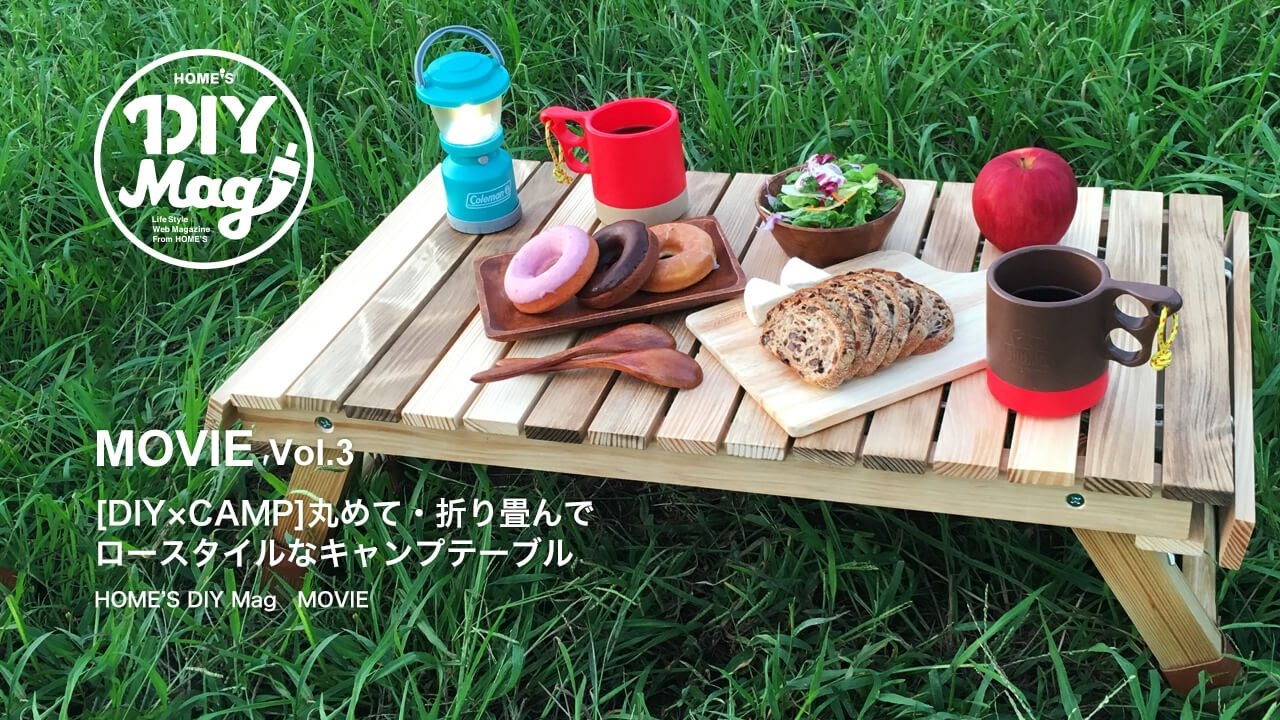
そろそろキャンプには寒い季節になってきましたが、今回はアウトドアでも室内でも大活躍するローテーブルをDIYしてみました。
最近オシャレなキャンパーたちの間で流行している「ロースタイルキャンプ」。
脚の短いローテーブルは低いチェアとともにリラックスした空間を作れます。もちろん、お部屋でローテーブルとして使用してもかわいいです!
これまでよりぐっとレベルがあがりますが、天板を丸めたり、脚を折りたたんだり、持ち運びに便利になるように作りました。また、機能だけではなく見た目も重視!3種類のワトコオイルを使って色合いに変化を付けたので、一層オシャレになりました。
サイトには図面も用意していますので、ぜひご活用ください!
その他のDIYの情報はこちらをチェック!
HOME’S DIY Mag – DIY・セルフリノベのWEBマガジン
https://diy.homes.jp/
【材料】
・木材42×24×1820mm…2本(700×2本、275×4本にカット)
・木材42×12×1820mm…5本(400×17本、380×2本にカット)
・棒Φ24×1820…1本(310×2本、にカット)
・サラねじ…小4本
・ナット…4個
・蝶ボルト…4個
・鬼目ナット…4個
・ワッシャー…8個
・厚手のリボン…(お好きな柄で)
・ナスカンフック…2個
・Dカン…2個
・革材(適当な大きさ)
・タッカー
・インパクトドライバー(ビット、ドリル、座ぐりドリル)
・ビス
・グルーガン
・グルーガン用スティック状ボンド 1本
・かなづち
・のこぎり
・差し金
・はさみ
・やすりカンナ
・紙やすり
・塗料・ワトコオイル 3色
└W-13:ダークウォルナット
└W-12:ミディアムウォルナット
└W-01:ナチュラル
・刷毛
・ウエス(布)
【DIYレシピ・作り方】
1. 木材に差し金で線を描き、のこぎりで必要な大きさ(材料に記載されているサイズ)に切ります。
2. 275mmに切った木材はのこぎりで角を落とし、やすりカンナと紙やすりで削って丸くします。
3. 275mm・380mm・700mmに切った木材はドリルで下穴をあけます。275mmの木材には座ぐりドリルを使って掘り込みをいれます。
4. 切った木材は全て紙やすりで表面を削ります。
5. 木材をワトコオイルで塗装し、よく乾かします。(半日~1日)。今回は3色のワトコオイル(材料参照)を使って、変化をつけました。ベースとなる色をナチュラルにして、脚にも使っています。
※注意:ワトコオイルは火気があるところでは使用しないでください。
ワトコオイルを塗った後は、ウエス(布)で表面に残っている浸透しきれない塗料を
拭き取ってください。詳しくはワトコオイルのホームページでご確認ください。
https://www.hoxan.co.jp/watco/customer/caution/
6. 380mmに切った木材を両端に置き、その間に400mmに切った木材を約5mm間隔であけて並べます。
7. その上にリボンを置いてタッカーで留めていきます。
8. 途中10本目を過ぎたところにDカンを通し、そのまま続けて木材を留めます。
9. 端にナスカンフックを通して、リボンを折り曲げた所にグルーガンを打ちリボンをくっつけます。
10. 700mmの木材と275mmの木材をサラねじ・ワッシャー・ナットでくっつけます。
11. 丸めた革材が275mmの木材を通るようにしてΦ24mmの木材に革を固定します。この時、先に革に穴をあけておくと留めやすくなります。
12. 700mmの木材に下穴をあけ、鬼目ナットを取り付けます。
13. リボンで繋げた木材の天板を両端にある380mmの木材にあけた穴に、ワッシャーと蝶ボルトを差込固定すれば完成です!
Designer/Model:石坂健(MARU代表)
Cinematographer : Mathilda Hitomi Bormann
今回も撮影にご協力いただいたのは、川崎市にある中原工房さん。
Place:中原工房http://nakahara-koubou.com/
—————-
[DIY×CAMP] Foldable compact raw wood style table.
This time we will teach you how to make a DIY foldable low table.
Compact and easy to carry around it’s the perfect item for outdoor activities like camping.
Check our website for more! Schematics will also be available for download!
HOME’S DIY Mag
https://diy.homes.jp/2016/10/31/movie0003/
【materials】
2 Wood planks 42×24×700mm
4 Wood planks 42×24×275mm
17 Wood planks 42×12×400mm
2 Wood planks 42×12×380mm
2 wood sticks Φ24×310mm
【How to make】
1.Trim the corner of the 275mm plank with a saw to make them round. Break the edges with a sandpaper.
2.Open holes on the 275mm・380mm・700mm planks. On the 275mm planks open also wider holes on opposite edge.
3. Smooth the upper surface of planks with a sandpaper.
4. Apply wood oil and let dry for a day (half day in summer). In this project we used tree different colors.
Tip: After applying the oil, don’t forget remove the excesses with a clean piece of cloth for a better finishing. Leave the cloth soaked in water while in use
Avoid using wood oil/paint close to fire.
5. Line up the 400mm planks leaving 5mm in between. Place a 380mm plank in each side
6. Hold the planks in place by stapling (with a staple gun) a band at every 5mm interval.
7. Around the 10th plank place a D-ring in the band before continue stapling the other planks in place.
8. When done place a snap-shackle at the end of both bands. Use a glue gun to hold it in place.
9. Attach the 700mm and 275mm planks together by using a phillips screw, flat washer and nut.
10. Attach the letter stripe to the Φ24mm stick and pulling it around the 275mm plank.
Tip: It will be easier if you open a hole on the leather stripe before driving the screw.
11. Open a hole into the 700mm plank and insert a nut
12. To place the table top to the support, screw a wing bolt in the holes open in the each side on the table top (380mm planks).

コメント